Mystery Paw RC1 is the first release of the modification that allows you to enable your children to do more with their Arcade1up Jr. Paw Patrol machine!
The installation and steps are as simple as (1,2,3) quite literally, though you will have to remove some plastic components from the cabinet to access the "real" USB port as well as remove the metal casing to access the SD card slot or real USB port.
We won't delay any longer however to provide the download link:
Download
https://mega.nz/file/opt2xRra#VmrbpEwrVGlMZ7nVaN3yyZIH7Xo4t6Ic1KD4bUtjaA4
Please note, this does not come with any ROMs or bios for systems. We will not and do not provide ROMs or bios for systems.
(BIOS are specifically recommended for GBA emulation, some games were found to be performing worse without bios present).
Instructions
The reason instructions are being provided is the work to get to the 'real' USB port is necessary to document with images, otherwise, this should be absolutely straightforward and easy to perform.
Pre-requisites: Micro USB cable, SD Card or USB flash drive (You'll need to modify the metal or use a really low profile USB drive),and a Phillips head screw driver.
Video Instructions - Kongs R Us Live Stream:
https://youtu.be/-bcZfRs5cWk?t=1856
Step 1
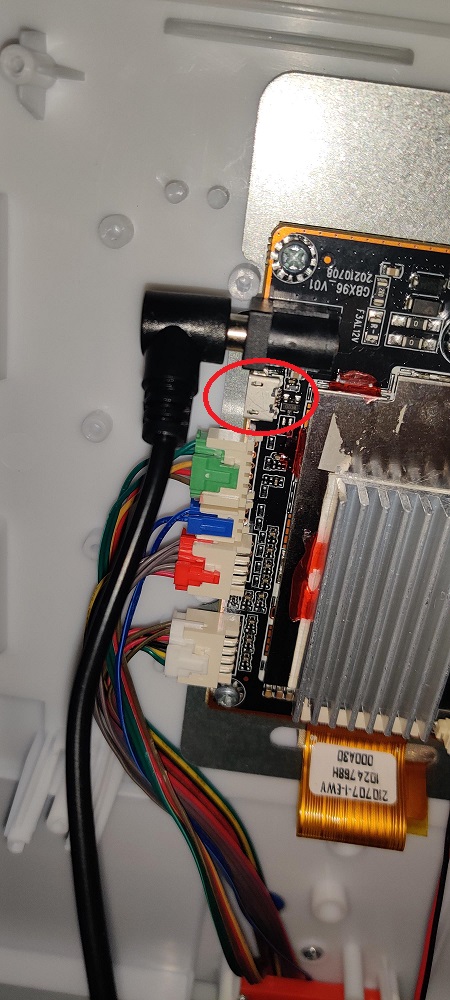
Start by removing the large plastic which covers up the PCB there should be about 4 screws and there's nothing attached to this but the MicroUSB to DC jack board which will come off safely and remain in the cabinet.
It might take a bit of work to get this piece off but once it's off you won't have much more trouble the piece referred to can be seen in the picture below.
Step 2
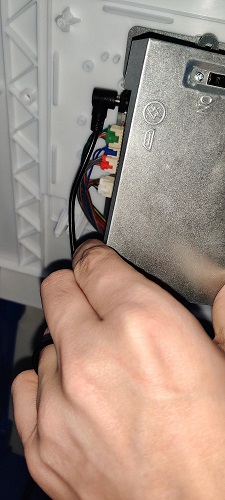
Remove the metal covering the PCB itself to gain access to the USB and SD card slots which are hidden by this metal, going forward if you're planning to use a USB drive instead of an sdcard ensure the USB drive will either fit under the metal or the metal can be cut/bent in a way that the USB drive will fit once you put everything back together.
NOTE: When removing this the switch seen where the "ON" is located is connected to the PCB, you'll want to leave this connected to the PCB and switch it to the OFF position, alternatively you can wait to complete this step until after you've followed the steps to perform on the PC (Where the PCB has already been modified to look for the SDcard or USB).
Step 3
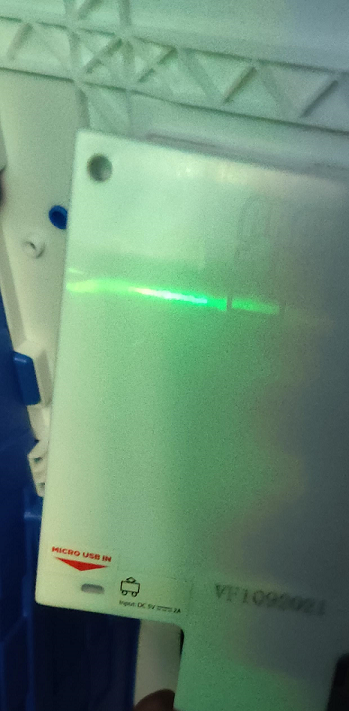
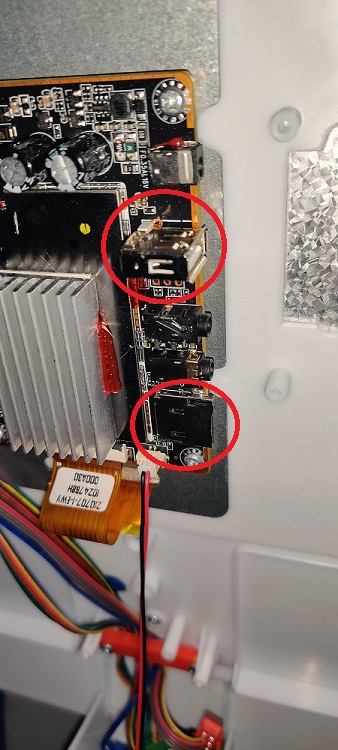
Locate the MicroUSB, SD Card slot and Full size USB slot as at least 2 of these will be necessary for future steps depending on if you plan to use an SD card or USB drive to store roms and artwork.
PC Side of Installation
Step 1
Connect the Micro USB cable to the port shown above on the PCB and connect the other end to your PC with the "flash mode switch" set to OFF instead of ON ( The flash mode switch is the one located on the outside of the PCB housing).
Launch the Mystery Paw application and click "Install driver" when the secondary application opens, again click "Install Driver"
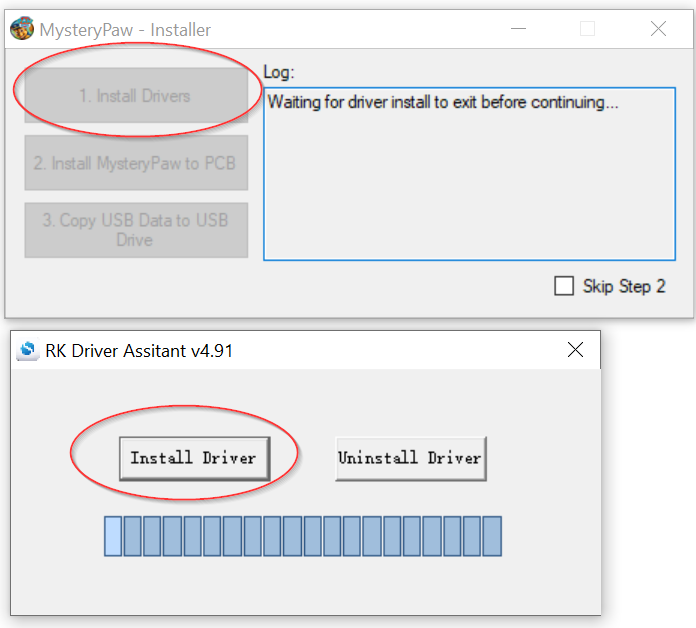
Step 2
At this point you should close the "RK Driver Assistant" application and see if the MysteryPaw software detects the PCB, if it's still not detected unplug the USB from the PC and restart the mystery paw application, once the MysteryPaw application is started again plug the USB back into the PC and proceed to Step 2 in the software "Install MysteryPaw to PCB".
It is very important that you do not interrupt this process (If your PC crashes, or something goes wrong you can repeat the process and it will still be able to finish the installation so there's no concern for it "bricking" anything).
Step 3
Insert the media into your computer that you plan to store the emulators, ROMs, and configurations on and click on "3. Copy USB data to USB drive" (You click this even if you're planning to use an SD card).
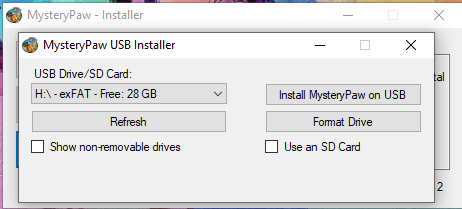
At this point you should see the window above, and you'll see the SD card and or USB drive listed in the drop down.
Note: If you do not see your USB drive or SD card in the drop down, refer to the readme for additional troubleshooting or click "show non-removable drives".
SD Card Note: If you're using an SD card MAKE SURE you click the check box for "Use an SD card".
The application should check if the drive is formatted with an appropriate file system but it is recommended to use the "Format Drive Option next.
Step 4
Now you'll click the "Install MysteryPaw on USB" or "SD Card" whichever you've got selected, and let it complete. After this safely remove the storage from the PC by finding it in windows explorer, right clicking and clicking "Safe Eject".
Plug it into the appropriate spot on the PCB, turn on the cabinet and you should see emulationstation.
If you see emulationstation and any roms you've added to the USB drive and or SD Card are there you're good to go and can put the cabinet back together it's now finished and MysteryPaw is completely installed!
Media Pack
This provides some basic pre-scraped media/images/videos/artwork for various ROMs but provides no actual ROM files, this is only for you to save some time with scraping media and have your kiddos have some nice images to look at instead of just words/lists of games.
"Installation" of this pack is as simple as grabbing the individual system folders and overwriting the existing ones on your USB drive and or SD card, emulation station will automatically read the gamelist.xml in each system folder and parse the appropriate artwork to be displayed if the ROMs are present.
Below are the top 10 games with artwork included in this media pack per system just to provide an example, for the full list either check out the downloaded_images folder or the gamelist.xml in each system, these were scraped on PC using ARRM by Franck Pouilly it's a nice tool, just a bit confusing to use.
Download Media Pack
https://mega.nz/file/dhtGnTqR#oEOTEwFd-3LVhc6aeP-umCiMEsJL5YQLDmLJNU8HUew
MAME Top 10
There aren't really 10 mame games included in the media pack for art work but here's the list of games that were scraped while the pack was being built.
- asteroids
- galaga
- galaxian
- jrpacman
- mspacman
- mslug
- mspacpls
- pacman
- tmnt22p
NES Top Games
Remember these were hand-picked specifically for a kid's cabinet so they're not necessarily the top games of the console or fan favorites but just things that we thought our kids might enjoy and scraped media for them so you don't have to.
- Super Mario Bros (1,2,3) (E) - Check gameslist.xml for actual rom name
- Tiny Toon Adventures (USA) 1/2
- Klax
- Chip 'n Dale Rescue Rangers (USA) 1/2
- Duck Tales (1/2)
- Adventures of Lolo
- Little Nemo
- Mickey's adventure in numberland
- Mickey's safari in letterland
- Teenage Mutant Ninja Turtles (Torunament Fighters, The arcade game, The manhattan project)
- Tale Spin
- Battle Toads
- Bonk's Adventure
- Bubble Bobble
Genesis Top Games
- TMNT yperstone Heist / Tournament Fighters
- Toy Story
- Vectorman
- Sonic (1/2/3)
- Smurfs (1/2)
- Mickey Mouse - (The timless Adventues of Mickey Mouse, Castle of illusion, Fantasia, Great Circus Mystery, Minnie's Magical Adventure, Ultimate Challenge, world of illusion)
- Mighty Morphin Power Rangers
- Magic School Bus
- Quack Shot Donald Duck
- Donald Duck in Maui Mallard
- Daffy Duck in Hollywood
- Decap attack
- Earthworm Jim
- Garfield - Caught in the act
- Mcdonald's treasure land adventure
- Bubsy 1/2
- Alladin
- Aero the Acro-bat 1/2
- A bug's life
- Comix Zone
- Gargoyles
- Yogi Bear's Cartoon Capers
GameBoy Color Top Games
Supringly enough game boy color and gameboy advanced games look really good on here due to the small size of the screen they're actually quite playable and enjoyable in our opinion.
- 102 Dalmatians - Puppies to the Rescue (fits right in right?)
- Rayman 1/2
- Rugrats - Various
- Shrek
- Tonka Construction Site
- Tom and Jerry - Various
- Winnie the Pooh
- Walt Disney World Quest
- Snoopy Tennis
- Smurf's nightmare
- Lego Island 2
- Elmo's ABCs
- Elmo's 123s
- Donald Duck - Goin' Quackers
- Donald Duck Quack Attack
- Dragon Tales Dragon Wings
- The Grinch
- Adventures of Elmo in Grouchland
Gameboy Advanced Top Games
- Super Mario Advance 2/3
- The Legend of Spyro - Various
- Crash Bandicoot - Various
- Shrek the Third
- Surf's up
- Spongebob various
- Tom and Jerry Various
- Happy Feet
- Hot Wheels - All out
- Rayman -Various
- Fraklin's Great Adventure
- Rugrats - Various
- Shark Tale
- Dragon Tales
- Power Rangers (Various)
- Kirby (Various)
Hopefully the list above gives you an idea of some roms to add that already have graphics/artwork preloaded for them with the media pack provided above.
NOTES
Why doesn't X rom/game have a picture?
You'll need to scrape the artwork for it and verify it's name the same as the stuff in "gamelist.xml" for that system, the readme gives some options for scraping rom artwork.
Where do roms go?
In the "roms" folder on the USB drive and or SD card.
What button is the start button?
The home button is the start button within retroarch emulated games.
Inserting Coins for MAME
There's not a lot of surface to work with here, so since the volume requires holding the home button to be adjusted to insert coins you just use the volume up slider and it'll call the insert coin action.
Exiting RetroArch/Emulated Games
You'll need to hold the home button and the red paw patrol button, this will bring you back to emulation station
Launching Paw Patrol
Simply slide the slider in the emulation station system selection to the paw patrol menu, click that and click the paw patrol game.
Exiting Paw Patrol
When in a paw patrol game you can simply hit the home button until you arrive back at the stock menu, hitting the home button again after this will bring you back to emulation station
Going Back to Stock
The beauty of that is, you just remove the USB drive/SD card and the game will boot normally as expected.
Volume Control
Volume is controlled within retroarch by holding the home button while moving the volume slider up or down. Within paw patrol this works normally, this is only for playing emulated games.
Accessing Retroarch Settings
Settings have been locked out using standard controls to prevent kiddos from accidently breaking something.
However, if you hold the home button on the arcade and have a keyboard plugged into the larger USB port you can press F1 and access the retroarch menu should you want to adjust settings.